Posts

Showing posts from 2020

[SOLVED] Koka fine payment issue related to cash register. You must have at least one cash register associated with this branch before you can record payments.

Image
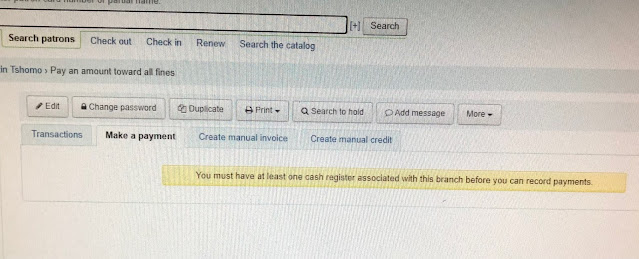
Solution to Koha fine payment issue related to cash register. Error message:  You must have at least one cash register associated with this branch before you can record payments. Solution : Go to Administration -- Global Preferences   and search for UserCashRegisters. Set the UserCashRegisters preferences to Don't Use Save it.

How to hide the Apache version and OS information to security scan?

In Ubuntu edit the following file sudo vim /etc/apache2/conf-enabled/security.conf Change  ServerTokens OS  to  ServerTokens Prod   then change  ServerSignature On  to  ServerSignature Off Restart the apache2 : sudo service apache2 restart In CentOS and RedHat edit the following file:  vim  /etc/httpd/conf/httpd.conf Change  ServerTokens OS  to  ServerTokens ProductOnly   then change  ServerSignature On  to  ServerSignature Off Restart the apache2 

Zabbix Frontpage not displaying after installation. Zabbix installation on Ubuntu 18.04.4.

After installing Zabbix , one may access the Zabbix Frontpage setting by http://IP_Address/zabbix/ However, if the page does not load and instead shows some text like below: "[T_ZBX_STR, O_NO, null, null, 'isset({enter})', _('Username')], 'password' => [T_ZBX_STR, O_OPT, null, null, 'isset({enter})'], 'sessionid' => [T_ZBX_STR, O_OPT, null, null, null], 'reconnect' => [T_ZBX_INT, O_OPT, P_SYS|P_ACT, BETWEEN(0, 65535), null], 'enter' => [T_ZBX_STR, O_OPT, P_SYS, null, null], 'autologin' => [T_ZBX_INT, O_OPT, null, null, null], 'request' => [T_ZBX_STR, O_OPT, null, null, null] ]; check_fields($fields); // logout if (isset($_REQUEST['reconnect'])) { DBstart(); add_audit_details(AUDIT_ACTION_LOGOUT, AUDIT_RESOURCE_USER, CWebUser::$data['userid'], '', _('Manual Logout'), CWebUser::$data['userid'] ); DBend(true); CWebUser::logout(); redirect('index.p

ZOOM FOR MOODLE - HOW TO ADD AND SETUP ZOOM PLUGIN IN THE MOODLE

Image
MANUAL TO ADD AND SETUP ZOOM PLUGIN IN THE MOODLE (VLE) *Note: To use zoom in VLE, the zoom meeting initiator (faculty in our case) must use official rub/college email address. 1.     Go to the zoom URL: http://drukren.zoom.us/ or http://zoom.us/ and click on sign in button. 2.     Click on Sign in with Google 3.     Click on Use another account            4 .   Enter your email and password:               5.     Click on Create Account            6.     If you get the following notice, click on View Detail and Choose           7.     Click on Join the Account and click on Continue   8. If you get the following notification, you are good to move ahead                  9.     Now login to your Moodle site: https://vle.jnec.edu.bt/ (for JNEC). Go to your course and click on Turn on Editing .         10. To add the zoom plugin, click on Add a

googleopenidconnect issue in Koha. Error: invalid_request* Invalid parameter value for redirect_uri: Missing scheme: /cgi-bin/koha/svc/auth/googleopenidconnect

First verify the following parameters in Google Developer’s Console : client id client secret  Authorized JavaScript origins (koha_opac_url) Authorized redirect URIs ( koha_opac_url//cgi-bin/koha/svc/auth/googleopenidconnect ) Make sure to set the following parameters in Koha system preferences: GoogleOAuth2ClientID : Google  OAuth2 Client ID GoogleOAuth2ClientSecret :  Google  OAuth2 Client Secret GoogleOpenIDConnect : Yes GoogleOpenIDConnectDomain : your domain (to restrict users from other domains to login) Finally check the OPACBaseURL in  Koha system preferences:

[Koha] How to upgrade Koha 19.11 to Koha 20.11? Also upgrade Ubuntu 18.04 to Ubuntu 20.04.

To upgrade Koha to 20.11, I would recommend to upgrade the operating system too. In my case I have upgraded Ubuntu 18.04 to 20.04 and then upgraded the Koha 19.11 to 20.11. To upgrade the OS, follow the steps below:  Step 1 : # sudo apt update Step 2 : # sudo apt upgrade Step 3: # sudo apt dist-upgrade Step 4: # sudo apt-get autoremove Step 5: #s udo apt install update-manager-core Step 6: # sudo do-release-upgrade Now to upgrade the Koha, follow the steps below:  Step 1: # sudo apt-get update Step 2: # sudo apt-get upgrade Step 3: # echo 'deb  http://debian.koha-community.org/koha  20.11 main' | sudo tee /etc/apt/sources.list.d/koha.list Step 4 :  #   sudo apt-get update Step 5: # sudo apt-get install koha-common Step  6: # sudo apt-get clean Step 7: # sudo koha-upgrade-schema   library (where 'li brary' is the koha instance name] Step 8: # sudo koha-rebuild-zebra -v -f library

Koha and Google’s OAuth 2.0 API to authenticate. How to setup Google Authentication in Koha 19.11?

Image
To setup the Google Authentication with Koha LMS, first you have to go to   Google Developer’s Console  to obtain OAuth 2.0 credentials for your application (in our case is Koha LMS) Create a new project and name it (Give a logical name - Cannot be edited) Next search for  Identity and Access Management (IAM) API   and enable it. Next, set the consent screen values: Application type : Internal  Application Name : Koha - LMS  (This name is what users will see) Application Logo : Upload your logo (Max. size 1MB) Support email : youremail address (shown to users) Authorized domains :  jnec.edu.bt    (press Enter to add it) Save it. Next create the credentials. Click on Create credentials and select OAuth client ID from the dropdown. Set the following parameters : Application type : Web application Name : Koha (Any name) Authorized JavaScript origins :  https://yourkohasite  (press Enter to add it) Authorized redirect URIs

Koha New Arrival Carousel Display on OPAC with Koha Coverflow Plugin

Image
First you will need to turn on the koha plugin system Open the koha-config.xml file #vim /etc/koha/sites/library/koha-conf.xml Change  <enable_plugins>0<enable_plugins>  to  <enable_plugins>1</enable_plugins>  in your koha-conf.xml file Confirm that the path to  <pluginsdir>  exists, in my case the path is   <pluginsdir>/var/lib/koha/library/plugins</pluginsdir> #/ect/init.d/apache2 restart   //Restart Webserver # /etc/init.d/memcached restart //Restart memcached Next go to Koha  system preference and enable the  UseKohaPlugins ( UseKohaPlugins  system preferences is removed in latest koha.  Koha plugins now only depends on config key  enable_plugins . ) Now, if you go to Administration -> Tools, you will see Tools Plugin  Now upload the  Koha Coverflow Plugin ( koha-coverflow-plugin-v2.4.29.kpz ) which can be downloaded from the following link: https://github.com/bywatersolutions/koha-plugin-coverflow/releases

Create Internal Page in Koha. Creating pages in Koha 19.11.

Image
Here is how to create a internal page in Koha 19.11 and how to link to a menu in Koha OPAC page. # cd  /usr/share/koha/opac/cgi-bin/opac #  cp opac-main.pl pages.pl   # vim pages.pl At around line line no#39 look for following line : template_name  => "opac-main.tmpl", You may either comment (with #) or replace the ' opac-mail.tmpl ' with ' pages.tt ' that you have created as template_name  => "pages.tt",   Now add the following code at around line no#112 my $page = "page_" . $input->param('p');                       my $preference = C4::Context->preference($page);              $template->{VARS}->{'page_test'} = $preference;   Save and exit the page. Next, Change the permission of the pages.pl #chmod 755 pages.pl Next: #cd /usr/share/koha/opac/htdocs/opac-tmpl/bootstrap/en/modules # cp opac-main.tt pages.tt #vim pages.tt At around line no# 109 look f