Posts

Showing posts from 2019

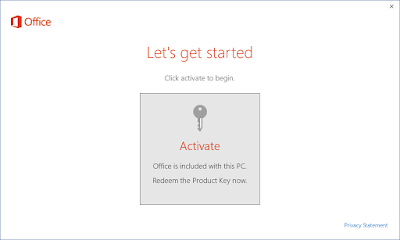
Solved. “Office is included with this PC. Redeem the product key now”, how to remove this activation prompt.

Image
To remove the “Office is included with this PC. Redeem the product key now” activation prompt, follow the steps below 1. Close the MS Office package 2. Press Windows Key +R and type regedit to open Registry Editor 3. Now go to HKEY_LOCAL_MACHINE\SOFTWARE\Wow6432Node\Microsoft\Office\16.0\Common\OEM 4. Right click on OEM and export to same the file in your desired location 5. Next delete the OEM file 6. Again go to HKEY_LOCAL_MACHINE\SOFTWARE\Microsoft\Office\16.0\Common\OEM 7. Export and then delete OEM as in setp 4 and 5. Now if you open the office application, the activation prompt should be gone.

Solved. How to remove pre-installed office in Windows 10? The office does not show in the Program & Features list.

Image
When the preloaded office package does not show in the Program and Features list, how do we uninstall it.  Here are the steps to remove preloaded office in Windows 10. 1. Go to setting 2. Click on Apps 3. Click on Apps & Features 4. Search for Office 5. Click on Microsoft Office Desktop Apps and click Uninstall

Solved:DNS resolver issue in Ubuntu 18.04 and later. How to stop dns entry in /etc/resolve.conf from getting changed after reboot.

Image
Earlier when we have DNS resolving issue, we open up /etc/resolv.conf file to add the dns entry and it works. Now with Ubuntu 18.04 and later, it doesn't. Every time we reboot the system, the dns entry gets changet to its default ip 127.0.0.53.  So how do we stop the dns entry from getting changed to its default value. Please try the following steps: Image below shows the default content of the /etc/resolv.conf file 1. First install the resolvconf package   #sudo apt-get install resolvconf 2. Open the file /etc/resolvconf/resolv.conf.d/head and add your nameservers detail       # Dynamic resolv.conf(5) file for glibc resolver(3) generated by resolvconf(8)       # DO NOT EDIT THIS FILE BY HAND -- YOUR CHANGES WILL BE OVERWRITTEN       # 127.0.0.53 is the systemd-resolved stub resolver.       # run "systemd-resolve --status" to see details about the actual nameservers. nameserver 192.168.255.227 3. Now restart the resolvconf service      # sudo

Solved: HP Proliant DL60 Gen9 cannot boot from usb

Image
When you create a bootable USB with Rufus, default setting does not work. So what you do is change the default Partition Scheme and target system type from MBR partition scheme for BIOS or UEFI to  MBR partition scheme for  UEFI. This should solve your issue. Rufus setting is shown in the image below

Moodle Bulk Course Upload with csv file: How to upload multiple course in Moodle using CSV file?? Here is the solution.

Image
For uploading course in bulk in Moodle with csv file , you will need to create category first.  Mandatory fields for course upload are shortname, fullname,    idnumber and  category_idnumber. shortname : short name for the course to upload fullname : course full name idnumber : id number of the course to be uploaded category_idnumber : category id where you want to place your course You may download the cvs template from here .  Let me show you how to upload the course now: 1. Create the course category. In my case I have created B.E. in Mechanical Engineering with subcategory Year I and under it Semester I . I want to upload few courses in Semester I. For this the category id is BEMESI . 2. Go to Site Administration -> Course--> Upload Course \ 3. Choose the csv file with all the course 4. Upload the csv file 5. Preview it once to check if every thing is set correctly 6. My preview shows one issue. Its because of duplicate course

Google Suite or Google Apps. Not receiving email from few senders? How to troubleshoot the issue??

Image
First Step: 1. Check if the email was delivered to G Suite. To do this, log in as administrator to your Google Admin Console 2.   Go to  Reports Audit Email log search .  Now if the mail has been delivered to G Suite, mails will be listed in the log as shown below: Again go to Admin Console and go the Groups Now selected the mail receiver group to which the mail is not delivered   In my case its group called 'Department Heads' . Go to Access Settings Now go to Moderation Setting: Then go to Pending messages under message. Mail waiting for moderation will be listed in the pending message:  Here, we have to options: 1. Just post the pending message 2. Or Post the message and always future message from the author.

Unknown interface eno2! If ifup/ifdown interfece name does not work and says Unknown interface

Unknown interface eno2! If ifup/ifdown interfece name does not work and says Unknown interface try the following command: #sudo ifconfig [interface-name] down / up example: $ sudo ifconfig eno1 up

Linux: Show Available Network Interfaces Names?

If you want to know network interface name which are by default not show with ifconfig use the following command: # ip link show

Upgrade Certbot in Ubuntu 16.04. How to upgrade Certbot?

1. Check you Certbot version    # certbot --version 2. Your Certbot version should be 0.28 or higher.If the version is <0.28 the do the following #sudo apt-get update #sudo apt-get install software-properties-common #sudo add-apt-repository ppa:certbot/certbot #sudo apt-get update #sudo apt-get install certbot python-certbot-apache 3. Check the version once again. You should have the latest Certbot  # certbot --version Note:  For more detailed information please visit https://certbot.eff.org/lets-encrypt/ubuntuxenial-apache

SOLUTION to Warning: The cli will be deprecated soon 'tacacs-server host 192.168.255.xx' Please move to 'tacacs server ' CLI

When you are configuring a tacacs in cisco switch and if you happen to get the following error. Then here is the solution:  Warning: tacacs-server host 192.168.255.xx  Warning: The cli will be deprecated soon  'tacacs-server host 192.168.255.10'  Please move to 'tacacs server <name>' CLI Solution: sw1-core#conf t Enter configuration commands, one per line. End with CNTL/Z. sw1-core(config)#tacacs? tacacs tacacs-server sw1-core(config)#tacacs ? server  Server configuration sw1-core(config)#tacacs server ? WORD Name for the tacacs server configuration sw1-core(config)#tacacs server 192.168.255.xx sw1-core(config-server-tacacs)#

Koha Due Date Calculation Issue. How to resolve the addition of additional days to library loan due date?

Image
If the setting is not done correctly, Koha will add unintended additional days to loan due date. For example, if your loan period is 60 days, Koha would add days on which your Libary is closed which will increase the loan period to 70 days. For example, in my case, I have set a loan period of 60 days. Which mean the borrower has to return the books after 60 days. My rules are as show in the image. However, if the setting is cont correctly configured, the loan period would be 70 days, instead of 60 days as per my rule. This is because Koha system is adding additional 10 sundays to the loan period. The issue is show in the following image. In the image the borrower due date is set to 70 days (check the dates) which sould not be the case as per my rule. SOLUTION To solve the issue, go to Administration-> Global System Preferences->Circulation-> Checkout Policy and look for  useDaysMode and set to circulation rules only. Now, if you try checking out

mysql_full_unicode_support#File_format issue while installing Moodle with MariaDB. Your database uses Antelope as the file format. 'innodb_large_prefix' to 'ON'

Image
this test must pass Your database uses Antelope as the file format. Full UTF-8 support in MySQL and MariaDB requires the Barracuda file format. Please switch to the Barracuda file format. See the documentation  MySQL full unicode support  for details. Check mysql_full_unicode_support#Large_prefix this test must pass For full support of UTF-8 both MySQL and MariaDB require you to change your MySQL setting 'innodb_large_prefix' to 'ON'. See the documentation for further details. Check If you get the above mention error. Try the following solution. Login to mysql and run the following command. mysql> SET GLOBAL innodb_file_format = barracuda  mnysql> SET GLOBAL innodb_file_per_table = 1  mnysql> SET GLOBAL innodb_large_prefix = 'on'  And refresh the browser. 

Email Notification in Koha: How to configure Email Notification in Koha 18.11 using Posfix?

Image
How to configure Email Notification in Koha 18.11 using Posfix? Here is the video tutorial.

Solution to Koha Error : .error retrieving biblio 314 at /usr/share/koha/bin/migration_tools/rebuild_zebra.pl while rebuilding zebra in Koha 18.11

If you get '.error retrieving biblio' issue while rebuilding zebra, the error is probably the issue is link to Perl libraries.  .error retrieving biblio 314 at /usr/share/koha/bin/migration_tools/rebuild_zebra.pl  .error retrieving biblio 315 at /usr/share/koha/bin/migration_tools/rebuild_zebra.pl  .error retrieving biblio 317 at /usr/share/koha/bin/migration_tools/rebuild_zebra.pl  .error retrieving biblio 318 at /usr/share/koha/bin/migration_tools/rebuild_zebra.pl  .error retrieving biblio 319 at /usr/share/koha/bin/migration_tools/rebuild_zebra.pl Try to run the following command for the solution: #export PERL5LIB="/usr/share/koha/lib" #export KOHA_CONF="/etc/koha/sites/library/koha-conf.xml" And rebuild the zebra once again # koha-rebuild-zebra -v -f library

Enable SIP2 in Koha. How to configure SIP server in Koha 18.11??

First to enable the SIP2, run the commands below: # koha-enable-sip library       [where library is the koha instance name] # koha-start-sip library          [start the sip server] # koha-stop-sip library           [stop the sip server] Next, configure the SIPconfig.xml # vim /etc/koha/sites/library/SIPconfig.xml Add the necessary details in the SIPconfig.xml file <acsconfig xmlns="http://openncip.org/acs-config/1.0/"> <!-- above address gets nothing, it's just a namespace -->   <error-detect enabled="true" /> <!--   Set Net::Server::PreFork runtime parameters   syslog_ident will identify SIP2 Koha server entries in syslog   For OpenSolaris, add: syslog_logsock=stream -->   <server-params             min_servers='1'            min_spare_servers='0'           log_file='Sys::Syslog'           syslog_ident='koha_sip'          syslog_facility='local6'    />   <listen

Apache2 Ubuntu Default Page! It works! If you webpage shows Apache default page and not your actual site. Here is the solution.

Image
If you get he default apache page as shown below: Disable the  default apache site with the following command: # sudo a2dissite 000-default.conf And restart the apache2: # service apache2 reload It should now show your intended site as shown

Koha Error, Can't locate Koha/Exceptions/DuplicateObject.pm while rebuilding the zebra database after Koha Upgrade.

root@lib:~# koha-rebuild-zebra -v -f library Do you get the following error while rebuilding the zebra database: Can't locate Koha/Exceptions/DuplicateObject.pm:   ./Koha/Exceptions/DuplicateObject.pm: Permission denied at /usr/share/perl/5.22/base.pm line 97.         ...propagated at /usr/share/perl/5.22/base.pm line 106. BEGIN failed--compilation aborted at (eval 26) line 3. BEGIN failed--compilation aborted at /usr/share/koha/lib/Koha/Exceptions.pm line 70. Compilation failed in require at /usr/share/koha/lib/Koha/DateUtils.pm line 22. BEGIN failed--compilation aborted at /usr/share/koha/lib/Koha/DateUtils.pm line 22. Compilation failed in require at /usr/share/koha/lib/C4/Log.pm line 30. BEGIN failed--compilation aborted at /usr/share/koha/lib/C4/Log.pm line 30. Compilation failed in require at /usr/share/koha/lib/Koha/Config/SysPref.pm line 26. BEGIN failed--compilation aborted at /usr/share/koha/lib/Koha/Config/SysPref.pm line 26. Compilation failed in requir

unmet dependencies issue while mariadb-server on Ubuntu 18.04(SOLVED).

To solve the unmet dependencies follow the instruction below: 1. Add the MariaDB GPG key to your system. Run the commend below: sudo apt-key adv --recv-keys --keyserver hkp://keyserver.ubuntu.com:80 0xF1656F24C74CD1D8 Note: For Ubuntu 18.04   install  software-properties-common  package to get  add-apt-repository  command. 2. A dd the MariaDB repository with the following command: sudo add-apt-repository 'deb [arch=amd64,arm64,ppc64el] http://ftp.utexas.edu/mariadb/repo/10.3/ubuntu bionic main' 3. U pdate the packages list: sudo apt update 4.  Now i nstall the MariaDB package:  sudo apt install mariadb-server

Video Tutorials : Bulk Import Excel records into Koha. How to perform a bulk import of records into Koha LMS?

Image

Bulk Import Excel records into Koha. How to perform a bulk import of records into Koha LMS?

Image
Koha will not let you import excel data directly into Koha system. To do this, you will need to convert the excel file into Marc file and then import into Koha. To convert to Marc file you will require MarkEdit software which is available for download from http://marcedit.reeset.net/ To convert Excel format into .mrk format First please make sure to save the data (library book list) in excel sheet in the format as in the file  here (Click the download the template) . All the columns are necessary. Leave the column(s) blank, if the data is not relevant. Follow the instructions below to import the Excel records into Koha Convert the Excel format to .mrk format First open the MarcEdit Application and Click on Delimited Text Translator Now upload the Source File. The source file is the Excel file with the book records. Specify the output file. DO NOT forget to save the output file as .mrk file. Click save. Now, click next. Select the Delimiter Values as