Posts

Showing posts from 2018

Problem binding to port 80: Could not bind to IPv4 or IPv6 (SOLVED) while installing SSL certificate.

Image
While trying to install SSL certificate if you come across the error "Problem binding to port 80: Could not bind to IPv4 or IPv6". First thing your try to do it to stop apache2 then try installing again. The screenshot below shows the error Stop the Apache2 and try again: Try installing the certificate again:

Upload pdf file in Wordpress 5.0 with Gutenberg.

Image
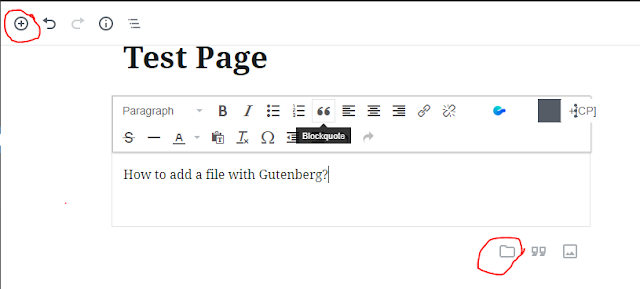
In the previous versions of Wordpress, we had the option to add files with Add Media button. But with the introduction of Gutenberg editor, the same button is missing. So now how do we achieve that with the new editor. Here is the solution. With Gutenberg comes the blocks and w ith blocks, you can insert, rearrange, and style multimedia content with very little technical knowledge. Instead of using custom code, you can add a block and focus on your content. To add a file, click on add block and select from the numerous options. There are two ways to add a file as shown in the image below: Click on + sign to open the options:  Or click the file icon at the bottom:

Xampp Warning! File permission Issue. Important! Because an activated User Account Control (UAC) on your system some functions of XAMPP are probably restricted. With UAC please avoid to install XAMPP to C:\Program Files (x86) (missing write permissions). Or deactivate UAC with msconfig after this setup.

Image
If you see a warning message as shown below while installing Xampp then that is because of file permission. Important! Because an activated User Account Control (UAC) on your system some functions of XAMPP are probably restricted. With UAC please avoid to install XAMPP to C:\Program Files (x86) (missing write permissions). Or deactivate UAC with msconfig after this setup. To avoid the message and continue the installation you can either select installation folder other that C:/Program Files or you can set the User Account Control (UAC) as follows: 1. In windows search for UAC and go to User Account Control Setting. You will see default setting as in the following image. 2. Now slide the slider down to 'Never Notify' and hit OK. Now you can continue to install the Xampp. Please note to set back the UAC's setting to its default setting unless you are familiar with the apps you are installing.

Dzongkha font in Photoshop! How to make Dzongkha and Tibetan fonts compatible in Photoshop?

Image
Photoshop normally distorts and cannot render complex Dzongkha and Tibetan fonts and makes it difficult to read and work with Dzongkha fonts. However DDC has the solution to the issue. To make the dzongkha font work : Download the Dzongkha Compatible PSD Template from Here Open the downloaded PSD template in Photoshop Replace the existing text in the text layer with your own text. You may now apply any paragraph, character or any other formatting on the text.

Dzongkha font in Indesign! How to make Dzongkha and Tibetan fonts work in Indesign CC?

Image
Normally Unicode compatible Dzongkha and Tibetan fonts do not work in the Indesign. It distorts the complex text script as shown in the image below. However, Dzongkha Development Commission (DDC) of Bhutan has come-up with two new fonts to overcome the limitation. The fontas are DDC Uchen font and the Jomolhari ID font which are free ans open source. To make the Dzongkha and Tibetan fonts compatible in Indesign CC, we have to enable the World-Ready Composer in Indesign. To do that we can either define a new paragraphs style or edit existing paragraph style. Then go to the paragraphs Style Options --> Justification and set Composer to " Adobe World-Ready Paragraph Composer " The World-Ready composer supports all Unicode Compatible Dzongkha fonts.

Adsense publisher ID! How to fix ads.txt issue not containing your Adsense publisher ID? If your check your Adsense dashboard the error will read as "Earnings at risk – One or more of your ads.txt files doesn't contain your AdSense publisher ID. Fix this now to avoid severe impact to your revenue."

Image
If there is issue with the ads.txt on your page, you will see a notification on your Adsense dashboard as shown below: To solve the issue first click on ACTION link just below the error message. This will show you the Publisher ID. Copy the publisher ID Now go to your blog page. In my case I am using blogspot.com. In the blogspot page, go to Setting and click on Search preferences. Under Monetisation, Click 'Yes' on Enable custom ads.txt content? and paste the copied publisher ID in the text area. Click on Save Changes button. After that you will have to allow the systems up to 24 hours to reflect the changes.

Memcached in Koha: How to enable memcached in Koha 17.xx and Koha 18.xx ?

Image
What is Memcached? Free & open source, high-performance, distributed memory object caching system , generic in nature, but intended for use in speeding up dynamic web applications by alleviating database load. Memcached is an in-memory key-value store for small chunks of arbitrary data (strings, objects) from results of database calls, API calls, or page rendering. Memcached is simple yet powerful . Its simple design promotes quick deployment, ease of development, and solves many problems facing large data caches. Its API is available for most popular languages. For more details visit :  https://memcached.org/ How to enable  Memcached in Koha? First check if your Memcached is running? To check go to Home -> About Koha -> System Information. If your memcached is not defined, you will see Memcached error similar to the screenshot below. To install memcached run the following command. # sudo apt-get install memcached     Configure Memcached in koha-

Postfix mail server! How to send a test mail to test Postfix mail server?

Image
First install postfix dependencies required to send mail #apt-get install mailutils To send a test mail use following command #echo "This is the TEST mail." | mail -s "TEST MAIL - Please IGNORE" learn_share@gmail.com If Postfix configuration is correct, then you will receive a mail in your inbox. Sample screenshot.

Zebra Server in Koha failed! OPAC search always says "No results found" is the result of Zebra Server issue. Zebra Server in Koha failed to start the you cannot search for items in Koha System.

Image
First thing to look for during troubleshooting is: Go to About Koha and check if there is error message as shown in the image below. It means your Zebra Server is not running. To start the Zebra Server: 1. # koha-stop-zebra library          Note: library is the koha instance name 2. # koha-start-zebra library It should solve the OPAC search issue.

Solution to Moodle Error: Coding error detected, it must be fixed by a programmer: Failed to unserialise data from file. Either failed to read, or failed to write.

Image
Did you ever come across the following error when you try to access Moodle, "Coding error detected, it must be fixed by a programmer: Failed to unserialise data from file. Either failed to read, or failed to write." This usually happens when cache files are corrupted, one probable cause can be improper shutdown of Moodle system. Here is the solution to fix the issue. 1. Go to Moodle root directory     #cd /var/www/html/moodle   2. Run the command      #php admin/cli/purge_caches.php 3. Go to moodledata/cache directory   #cd /var/moodledata/cache    4. Remove the cache store directory, DO NOT remove of change the core_component.php file    # rm -rf cachestore_file/ 5. Refresh the Moodle Page. Its should work.

Max key length is 767! Getting ERROR 1071 (42000) at line 1127: Specified key was too long; max key length is 767 bytes while restoring mysql dump file?

This usually happens with Mariadb databases. To solve the issue create database with default utf i.e with  DEFAULT CHARACTER SET utf8 COLLATE utf8_unicode_ci. Then login into mysql: #mysql -u username -p And set the following settings: MariaDB [(none)]> SET GLOBAL innodb_file_format=Barracuda; Query OK, 0 rows affected (0.00 sec) MariaDB [(none)]> SET GLOBAL innodb_large_prefix=on; Query OK, 0 rows affected (0.00 sec) MariaDB [(none)]> SET GLOBAL innodb_file_per_table=on; Query OK, 0 rows affected (0.00 sec) MariaDB [(none)]> exit This should solve your issue.

Wordpress Admin Login! How to easily change the Wordpress default admin login URL ?

Image
We can achieve this by WP Hide & Security Enhance plugin. 1. Download and install WP Hide & Security Enhance plugin and activate it 2. Click on WP Hide -> Admin on you dashboard 3. In the wp-login.php tab, change the default wp-login.php to your choice file name e.g yoururlhere.php. Click YES to block the default url and Save the setting. 4. Next on the Admin URL tab, change the wp-admin to your dashboard. Then click YES to block the default and save it to block the default admin URL. 5. Now you can login with new admin login URL. 6. You are done.

Password Reset Link in Koha! How to enable Password Reset Link in Koha 17.11 and reset password via email in the OPAC ?

Image
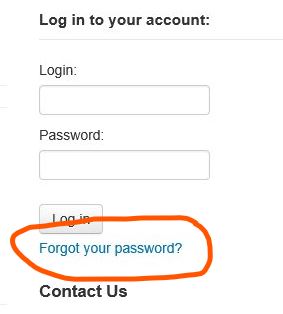
Here is how you can enable the password reset link on Koha OPAC. All the patron must have a valid email address in the Koha system. Go to Administration -> Global System Preferences -> OPAC  -> Features and set   'OpacResetPassword' to 'allowed'   'OpacPasswordChange' to 'Allow' Refresh front page,  a 'Forgot your password?' link should show on the OPAC page. 3. Password_Reset Notice must be enable in the Notices and Slip Section. To do this go to:        Tools -> Notices and tools   and enable the PASSWORD_RESET notice 4. Now try the "Forgot your password?" by providing either the username or valid email addresses. If everything is set up correctly the you will receive a password reset link in your email inbox. 5. Click on the link to reset your password. Troubleshooting:  Invalid URL :  /cgi-bin/koha/opac-password-recovery.pl?uniqueKey=$JnesolaYk854oKESsoLya If you hap

DDL sql execution error while upgrading from Moodle 3.4 to Moodle 3.5.1+ (SOLVED).

Here is the solution to  DDL sql execution error  ,while upgrading the Moodle 3.4 to Moodle 3.5.1+. The following is the copy of the error. Upgrading to new version search_simpledb DDL sql execution error More information about this error × Debug info:  Table 'mdl_search_simpledb_index' already exists CREATE TABLE mdl_search_simpledb_index ( id BIGINT(10) NOT NULL auto_increment, docid VARCHAR(255) COLLATE utf8mb4_unicode_ci NOT NULL DEFAULT '', itemid BIGINT(10) NOT NULL, title LONGTEXT COLLATE utf8mb4_unicode_ci, content LONGTEXT COLLATE utf8mb4_unicode_ci, contextid BIGINT(10) NOT NULL, areaid VARCHAR(255) COLLATE utf8mb4_unicode_ci NOT NULL DEFAULT '', type TINYINT(1) NOT NULL, courseid BIGINT(10) NOT NULL, owneruserid BIGINT(10), modified BIGINT(10) NOT NULL, userid BIGINT(10), description1 LONGTEXT COLLATE utf8mb4_unicode_ci, description2 LONGTEXT COLLATE utf8mb4_unicode_ci, CONSTRAINT PRIMARY KEY (id) , KEY mdl_searsimpinde_o

Auto increment problem in Koha. How to fix the Koha auto increment problem? When you check-in a book if you get error message "The item has not been checked in due to a configuration issue in your system. You must ask an administrator to take a look at the about page and search for the "data problems" section". Then the issue is with Koha auto increment.

Image
 How to fix the Koha auto increment problem? When you check-in a book if you get error message "The item has not been checked in due to a configuration issue in your system. You must ask an administrator to take a look at the about page and search for the "data problems" section". Then the issue is with Koha auto increment. Check the detailed information regarding the issue in Koha, go to About Koha -> System Information. You will see the issue as in the screenshot below: Fix or solution to the issue: First clean up the incorrect data records. To do this first log on to the koha server and then log into the mysql:            sudo mysql -u root -p (Note: koha_library = Database Name)           use koha_library;   Now delete all the data that is corrupted from respective database tables with the delete command. The IDs of the corrupted items can be copied from the System Information : MariaDB[koha_library]> DELETE FROM deletedbiblio WH

ACTION_FAILED:OU_INVALID: Solution for GoogleApps bulk user upload issue, username@domainname.com:ACTION_FAILED:OU_INVALID. This error is because you have not specified the Org Unit Path properly.

To upload bulk users to GoogleApps, you will require a following required fileds, other fields are optional:-               First Name               Last Name               Email Address               Password               Org Unit Path What is 'Org Unit Path'? This field was not their earlier. This is the path to place users in an organizational unit. For example if your domain has different organization unit like , staff, students, guest etc.. then the Org Unit Path would be just :  /

Progress bar: Dump and restore mysql database with progress bar.

Image
Showing progress bar while dumping or restoration of the dump, would be a handy tool. Here is how you do it. You can achieve with  pipe viewer. # apt-get install pv An you may use the pv as shown in the image below to restore the database from a backup file.. # pv database.sql | mysql -u uname -p databasename And to backup the database to a sql file with pv, use the following command. #mysqldump -u username -p databasename | pv -W > database.sql Compress the database file in  gzipped version of the sql file #mysqldump -u username -p databasename | pv -W | gzip > database.sql.gz Restore the gzipped file #pv database.sql.gz | gunzip | mysql -u root -p databasename

Phpmyadmin root login: Can't login to phpmyadmin with 'root' user. Here is the solution!

Upon installation of phpmyadmin, you can login with user 'phpmyadmin' (default user), however if you want to login as root user then you have to re-configure the phpmyadmin. Do as follows to re-configure. Run the commant to reconfigure:        $sudo dpkg-reconfigure phpmyadmin Now you will be asked series of question, do as follows: Hit : <Ok> Reinstall database for phpmyadmin: <Yes> Connection method for MySQL database server for phpmyadmin: TCP/IP Host name of the MySQL database server for phpmyadmin: localhost Port number for the MySQL service: 3306 MySQL database name for phpmyadmin: phpmyadmin Hit : <Ok> MySQL username for phpmyadmin: root MySQL application password for phpmyadmin: your_password_here Password confirmation:  your_password_here Name of the database's administrative user: root Web server to reconfigure automatically: apache2 An error occurred while installing the database: ignore And you are done! Now you can logi