Posts

Showing posts from 2021

Proxmox - How to backup and restore VMs and CTs between different servers in Proxmox?

Image
 Here is how to use Proxmox GUI to backup and move VMs and CTs to different Servers. First make sure the VM/CT that you want to move is stopped. Click on the VM/CT that you want to move and click on backup. Select the as follows: Storage : local Mode    : Snapshot Compression : LZO(fast) send email to: none Once the back up is done: TASK OK message will be displayed. Confirm your backup is stored in the local disk. Download WinSCP   to download and upload the backup files between servers. Login to the backup server using WinSCP Locate the backup file in the directory /var/lib/z/dump and download the backup file Once backup has been done, login to new server using WinSCP In the new server, go to same directory /var/lib/z/dump  and copy the file from your desktop to the new server. Now from Proxmox GUI in new server, Select local disk and click on Backups, all the backup will be listed. Select the one that you wish to restore. Don't have to change anything i...

Moodle OAuth 2. This account is pending email confirmation! Solved

Image
If you happen to come across this ' This account is pending email confirmation' message while using Google OAuth2 in Moodle. Try these following solutions: Solution 1. First login to you Moodle and Admin. Go to Site Administration --> Server--> oAuth 2 Services go to setting. Make sure the Require email verification is NOT checked. Solution 2: Login to Moodle database and delete the particular user #mysql -uroot -p\ mysql> use moodledb; mysql> SELECT * FROM mdl_auth_oauth2_linked_login WHERE email='sjamso@moodle.edu.bt'; mysql>D ELETE FROM mdl_auth_oauth2_linked_login WHERE email='sjamso@moodle.edu.bt';

Solved. Install SSL for Proxmox VE 6.3 using Certbot by Let's Encrypt (LE)

  I nstall certbot with apt: # apt install certbot Rub the following command and follow the instructions on the  screen to obtain the certificate. # certbot certonly Copy the certificate from the Let's Encrypt  directory to the PVE directory #cp /etc/letsencrypt/live/proxmox.jnec.edu.bt/fullchain.pem /etc/pve/local/pve-ssl.pem #cp /etc/letsencrypt/live/ proxmox .jnec.edu.bt/privkey.pem /etc/pve/local/pve-ssl.key #systemctl restart pveproxy Cronjob to renew the certificate: Lets Encrypt SSL expire every 90 days, so we will renew it every month with a cronjob. For this, create a file #  vim /usr/local/bin/renew-pve-certs.sh with the following code : cp /etc/letsencrypt/live/proxmox.jnec.edu.bt/fullchain.pem /etc/pve/local/pve-ssl.pem cp /etc/letsencrypt/live/proxmox.jnec.edu.bt/privkey.pem /etc/pve/local/pve-ssl.key service pveproxy restart Make it executable : #chmod 755 /usr/local/bin/renew-pve-certs.sh Run this command every 30 days, add the following in the cro...

SOLVED - ftp:// URLs not opening in Google Chrome but works in other browser like Firefox and IE

  Google adds temporary flag to Chrome to allow FTP protocol. By default, you cannot open a FTP site like ftp://ftp.sj.edu.org. Solution: Change the default setting. 1. On chrome open :  chrome://flags/ 2. Look for   Enable support for  FTP  URLs 3. Change the setting  Default to Enabled  from the dropdown. 

[Solved] Wordpress Permalink settings set to 'Post Name' breaks the page.

 Solution: Edit the Apache file below #vim /etc/apache2/apache2.conf <Directory /var/www/>         Options Indexes FollowSymLinks         AllowOverride  None         Require all granted </Directory> Change to : <Directory /var/www/>         Options Indexes FollowSymLinks         AllowOverride  All         Require all granted </Directory>

Regenerate and configure SSL certificates for Freeradius for Eduroam

 1. Remove the old certificates: # rm /etc/freeradius/3.0/certs/* 2. Copy the original files # cp /usr/share/doc/freeradius/examples/certs/* /etc/freeradius/3.0/certs/ 3. Edit the lines under the  certificate_authority  section as needed for the following two files: # vim /etc/freeradius/3.0/certs/ca.cnf # vim /etc/freeradius/3.0/certs/server.cnf [ CA_default ] . . . default_days = 1825 . . . [server] countryName = BT stateOrProvinceName = Samdrup Jongkhar localityName = Dewathang organizationName = JNEC emailAddress = sj@gmail.com commonName = "ITSU" . . . 5. Generate the certificate: # cd /etc/freeradius/3.0/certs/ # cd /etc/freeradius/3.0/certs/ # make ca.der # make printca # make dh # make server.pem # chown freerad:freerad * # service freeradius restart

Install SSL certificate on Ubuntu 20.04 using Certbot

  First  you make sure you have a  virtual host file  for your domain. I n my case I have  /etc/apache2/sites-available/ www .conf   Step 1 — Installing Certbot $ sudo apt install certbot pyt hon3-certbot-apache Step 2 — Allowing HTTPS Through the Firewall $ sudo ufw allow 'Apache Full' $ sudo ufw delete allow 'Apache' Step 3 — Obtaining an SSL Certificate $ sudo certbot --apache Saving debug log to /var/log/letsencrypt/letsencrypt.log Plugins selected: Authenticator apache, Installer apache Enter email address (used for urgent renewal and security notices) (Enter 'c' to cancel): your_email@domain - - - - - - - - - - - - - - - - - - - - - - - - - - - - - - - - - - - - - - - - Please read the Terms of Service at https://letsencrypt.org/documents/LE-SA-v1.2-November-15-2017.pdf. You must agree in order to register with the ACME server at https://acme-v02.api.letsencrypt.org/directory - - - - - - - - - - - - - - - - - - - - - - - - - - - - - - - - - -...

Koha Header or banner Image, Koha 20.11. How to place a header or banner image in koha 20.11 opac?

Image
 Unlike older koha version, Koha 20.05 and Koha 20.11, does not have global preferences like opacheader,  OpacMainUserBlock and few other preferences.  So to add header image, first, place the image  in  /usr/share/koha/opac/htdocs --Next, go to Tools -- News -- New Entry . --Select opacheader from the Display location Dropdown -- In the editor, click on the image upload icon and specify the URL and size as show in the image below.

[SOLVED] MySQL DROP DATABASE taking so long?

Image
To check what is blocking the DROP DATABASE command, run the following command; #mysqladmin processlist -u root -p You can see the query id 50, 200 and 207 is blocking the dropping of koha_library. Use mysql to terminate the query; #mysqladmin kill 50 Repeat the termination for other IDs.

Email Notification in Koha! How to configure Email Notification in Koha 20.11 with postfix?

Image
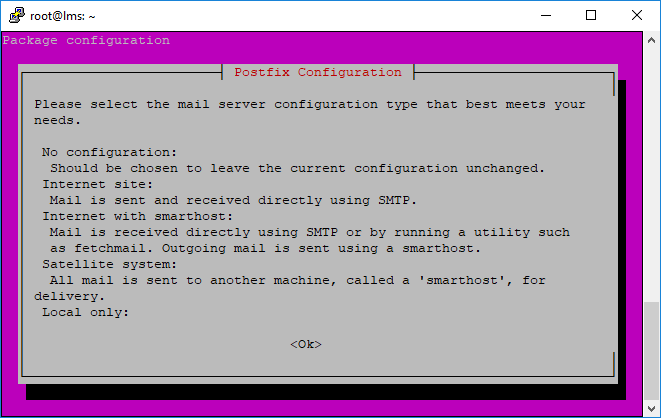
Here is the steps to configuring Koha 20.11 & postfix for sending notices/slips through email. 1. First install postfix             #sudo apt-get update             #sudo apt-get install postfix          Click on OK.    Tab and select No configuration. 2.  Copy the configuration file     #  cp /usr/share/postfix/main.cf.debian /etc/postfix/main.cf 3. Install the other required packages.     #apt-get install libsasl2-2     #apt-get install libsasl2-modules     #apt-get install ca-certificates 4.  Open the following file and add few lines.     # vim /etc/postfix/main.cf and add the following lines at the bottom of the page and save the file.     relayhost = [smtp.gmail.com]:587     smtp_sasl_auth_enable = yes     smtp_sasl_password_...

Proxmox, Add PCI Error, No IOMMU detected, please activate it. See Documentation for further information.

Image
Error : Solution : Open the file /etc/defult/grub  replace the line GRUB_CMDLINE_LINUX_DEFAULT= "quiet" with GRUB_CMDLINE_LINUX_DEFAULT= "quiet intel_iommu=on" # update-grub Generating grub configuration file ... Found linux image: /boot/vmlinuz-5.4.78-2-pve Found initrd image: /boot/initrd.img-5.4.78-2-pve Found linux image: /boot/vmlinuz-5.4.73-1-pve Found initrd image: /boot/initrd.img-5.4.73-1-pve Found memtest86+ image: /boot/memtest86+.bin Found memtest86+ multiboot image: /boot/memtest86+_multiboot.bin Adding boot menu entry for EFI firmware configuration done # reboot // the VM

[SOLVED] koha SIP Server Start Issue. koha-start-sip lib Deprecated script used (koha-start-sip)

 Issue : #sudo koha-enable-sip library # koha-start-sip library   Deprecated script used (koha-start-sip) Solution: You can manually start and the SIP2 Server in Koha cd /usr/share/koha/lib export PERL5LIB=/usr/share/koha/lib export KOHA_CONF=/etc/koha/sites/library/koha-conf.xml perl -IC4/SIP/ -MILS C4/SIP/SIPServer.pm /etc/koha/SIPconfig.xml

[Solved] [Wordpress Updates Issue] An unexpected error occurred. Something may be wrong with WordPress.org or this server’s configuration. If you continue to have problems, please try the support forums.

 Error : An unexpected error occurred. Something may be wrong with WordPress.org or this server’s configuration. If you continue to have problems, please try the support forums. Solution : First find the ip address of the api.wordpress.org C:\Users\SJ/PC-G>nslookup wordpress.org Server:  ns0.jnec.edu.bt Address:  192.168.255.222 Non-authoritative answer: Name:    wordpress.org Address:  198.143.164.252 In the Wordpress host server, run the following command: echo "198.143.164.251 api.wordpress.org" >> /etc/hosts

[Solved][Proxmox update] Failed to fetch https://enterprise.proxmox.com/debian/pve/dists/buster/InRelease 401 Unauthorized [IP: 51.79.159.216 443]

Here is the solution to the Proxmox update and upgrade issue. Error :  E: Failed to fetch https://enterprise.proxmox.com/debian/pve/dists/buster/InRelease  401  Unauthorized [IP: 51.79.159.216 443] Error:  root@moni:~# # apt update Hit:1 http://security.debian.org buster/updates InRelease Hit:2 http://ftp.debian.org/debian buster InRelease            Hit:3 http://ftp.debian.org/debian buster-updates InRelease    Err:4 https://enterprise.proxmox.com/debian/pve buster InRelease 401  Unauthorized [IP: 51.79.159.216 443] Reading package lists... Done            | E: Failed to fetch https://enterprise.proxmox.com/debian/pve/dists/buster/InRelease  401  Unauthorized [IP: 51.79.159.216 443] E: The repository 'https://enterprise.proxmox.com/debian/pve buster InRelease' is not signed. N: Updating from such a repository can't be done securely, and is therefore disabled by default. N: See apt-s...

(Solved) Mysql (MariaDB 10.+) login without password or with some random string.

Image
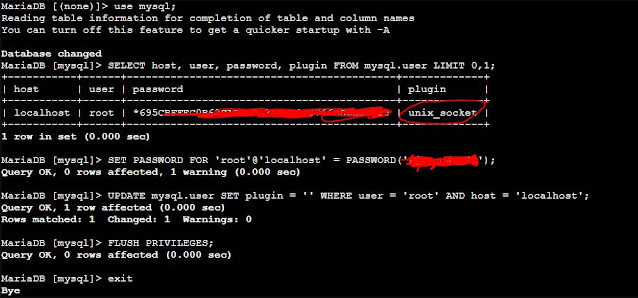
 Even if you successfully set the mysql root password, mysql(MariaDb 10.+) allows you to login without any password or with any random string.  Solution :  the default mariaDB installations plugins like  'console' or 'unix_socket' allows us to login without password. Try following commands to solve the issue.  mysql -u root -p  use mysql; SELECT host, user, password, plugin FROM mysql.user LIMIT 0,1; --------------------------------------------------------------------------------- SET PASSWORD FOR 'root' @ 'localhost' = PASSWORD ( 'MyNewPass' ); UPDATE mysql.user SET plugin = '' WHERE user = 'root' AND host = 'localhost' ; FLUSH PRIVILEGES ;

Easiest way to fix the time zone in Ubuntu

Image
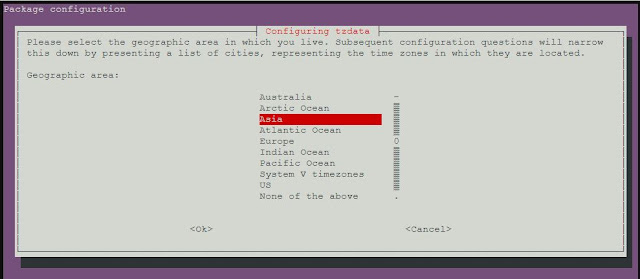
 #dpkg-reconfigure tzdata

(Solved) (Fixed )MariaDB Unmet Dependencies on Ubuntu 20.04.

Error or Issue : Unmet Dependencies:  # sudo apt install mariadb-server Reading package lists... Done Building dependency tree        Reading state information... Done Some packages could not be installed. This may mean that you have requested an impossible situation or if you are using the unstable distribution that some required packages have not yet been created or been moved out of Incoming. The following information may help to resolve the situation: The following packages have unmet dependencies:  mariadb-server : Depends: mariadb-server-10.3 (>= 1:10.3.25-0ubuntu0.20.04.1) but it is not going to be installed E: Unable to correct problems, you have held broken packages. Solution or Fix : Remove the different version of MySQL/MariaDB. To check the version run the following command. #  dpkg -l | grep -E 'mysql|mariadb' output:  ii  libdatetime-format-mysql-perl          0.06-1        ...