Posts

Showing posts from 2016

Bulk unenroll user in Moodle: How to unenroll or remove users from a course in a bulk in Moodle?
Image
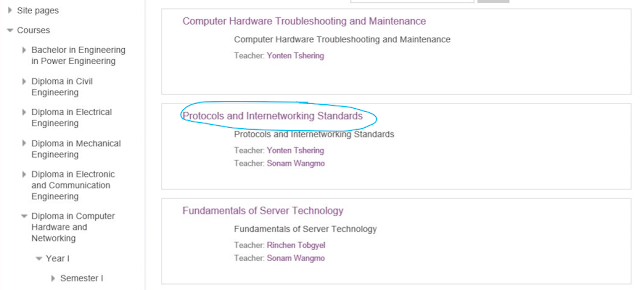
How to remove all the previous enrolled users (students) from a course at once? 1.       Go to your course and then click on it. 2.       Under Course Administration, click on Users and then Enrollment Method 3.       Delete the Enrollment Method you have used to enroll the students. In the example below, enrollment method used is named Younten which has 47 enrolled users. Click on the x icon to delete the method. This would remove all the enrolled users from the course. Note: Default Enrollment method name is Self enrolment (Student). 4.       Confirm the Deletion. 5.       Add new method to enroll new batch of students. Select Self enrollment from the Add method drop-down. 6.       Give a name for your method (any name). Specify the enrollment key for ...
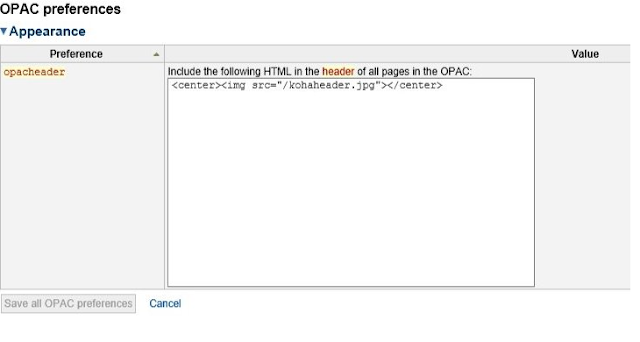
Header in OPAC in Koha! How to add a header image on OPAC page in Koka 3.20?

Image
Create a header image with size 1475x120 pixel or size of your choice Step 1 : Put the image (header image) of your choice  in   /usr/share/koha/opac/htdocs Step 2: Go to koha system preferences and under OPAC in the opacheader type in the html                <center><img src="/kohaheader.jpg"></center> Step 3: Save it and you have a header of your choice.

DesignBuilder Software. How to generate new license file(.lic)? How to make Designbuilder License server work with the new server hostname?

Image
Changing the hostname will require you to generate a new license file. Please can you re-activate the license using the URL: http://www.designbuilder.co. uk/license/activate_site.php and enter your details including the new hostname and hostid. More information on activation the site license can be found in the documentation: http://www.designbuilder.co. uk/helpv4.7/# SiteNetworkLicenses.htm Enter the license activation and server host details   Download the license file   Copy the .lic file into the license server  and restart the the RLM by /etc/init.d/rlm restart. If you come across the following error during the restart,   Try replacing the localhost with the hostname of the license server.   Restart the RLM server again and then try to connect to the server again.  

Apache 'start' failed. How to solve the apache starting and no listening sockets available, shutting down, issue?

Image
If your apache fail to start and shows the following error apache2.service - LSB: Apache2 web server    Loaded: loaded (/etc/init.d/apache2)    Active: active (exited) since Mon 2016-04-04 09:53:19 BTT; 6min ago      Docs: man:systemd-sysv-generator(8)   Process: 17233 ExecStop=/etc/init.d/apache2 stop (code=exited, status=0/SUCCESS)   Process: 12489 ExecReload=/etc/init.d/apache2 reload (code=exited, status=1/FAILURE)   Process: 17275 ExecStart=/etc/init.d/apache2 start (code=exited, status=0/SUCCESS) Apr 04 09:53:19 vle.xxx.edu.bt apache2[17275]: [Mon Apr 04 09:53:19.068063 2016] [alias:warn] [pid 17288] AH00671: The Alias directive in /etc/phpmyadmin/a...er Alias. Apr 04 09:53:19 vle.xxx.edu.bt apache2[17275]: (98)Address already in use: AH00072: make_sock: could not bind to address [::]:8080 Apr 04 09:53:19 vle.xxx.edu.bt apache2[17275]: (98)Address already in use: AH00072: make_sock: could not bind to address 0.0.0.0:8080 Apr...

Change Google Apps Primary Domain Name! How to change a primary domain name in Google Apps without losing you old mails?

To make sure that you don't lose your old mails while changing the primary domain of your Google Apps please follow the sequence of steps below. The steps needed to start the domain name change. Part 1—Add a secondary domain: 1. Navigate to the Admin console "Home" page at: https://admin.google.com/ 2. If prompted to sign in, enter your Super Admin credentials 3. Click the "Domains" icon—it may be hidden under "More controls" 4. Select "Add/remove domains" 5. Click "ADD A DOMAIN OR DOMAIN ALIAS" 6. Select "Add another domain" 7. Enter a domain name for the secondary domain—you will later swap this with the primary domain. 8. Click "CONTINUE AND VERIFY DOMAIN OWNERSHIP" 9. Follow the on-screen instructions to verify domain ownership 10. After making the appropriate changes, click "VERIFY" 11. If successfully verified, a "Congratulations" message will be displayed 12. Click ...

DesignBuilder Software. How to connect client to DesignBuilder License Server?

Image
Toturials for connecting Client DesignBuilder to License Server 1.     Open the DesignBuilder software on the client machine. Go to Help menu and click on the License on the dropdown as shown in the image below. 2.     You will see a dialog box as show below. Click on the License Button as shown on the image. 3.              Select Site network license and click Next button. 4.     Enter host server name as web.jnp.edu.bt and port as 5053 and hit Next Button. 5.     Click Finish Button. 6.     If you successfully establish connection to the license server, you will see the screenshots as below. If you are not able to establish connection please contact your Administrator.